
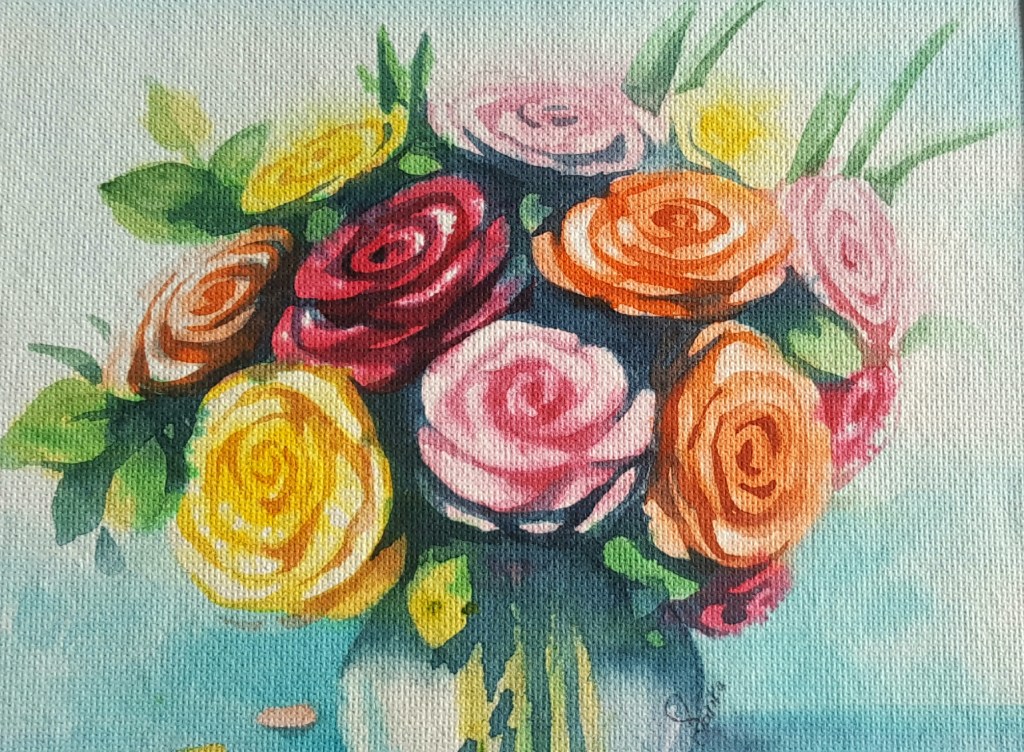
Beauty

Purity in Heart,
Calmness in Mind,
Makes our Beauty Shine…
Beauty
Purity in Heart,
Calmness in Mind,
Makes our Beauty Shine…
Christmas Celebration
As the Christmas Bells are ringing and we all are all set to welcome the Festive Season of Christmas together.Here, is an easy to do Acrylic Painting of Christmas decorations without which this festival is incomplete.Hope you enjoy the process and have a wonderful month of Christmas with your near and dear ones.Merry Christmas too all of you.
As the festive season is round the corner, here I am with an easy Christmas Painting to put on your beautifully decorated Wall.
ART SUPPLIES USED ARE AS FOLLOWS :
* Windsor and Newton Acrylic colors.
*Acrylic Color Brushes.
*Gresso primer
*Canvas 6” *6”.
**Drawing Christmas Celebration step by step **
Lets get started with Painting then , so firstly we will be applying the Gresso white primer uniformly to your canvas and leave to dry completely .
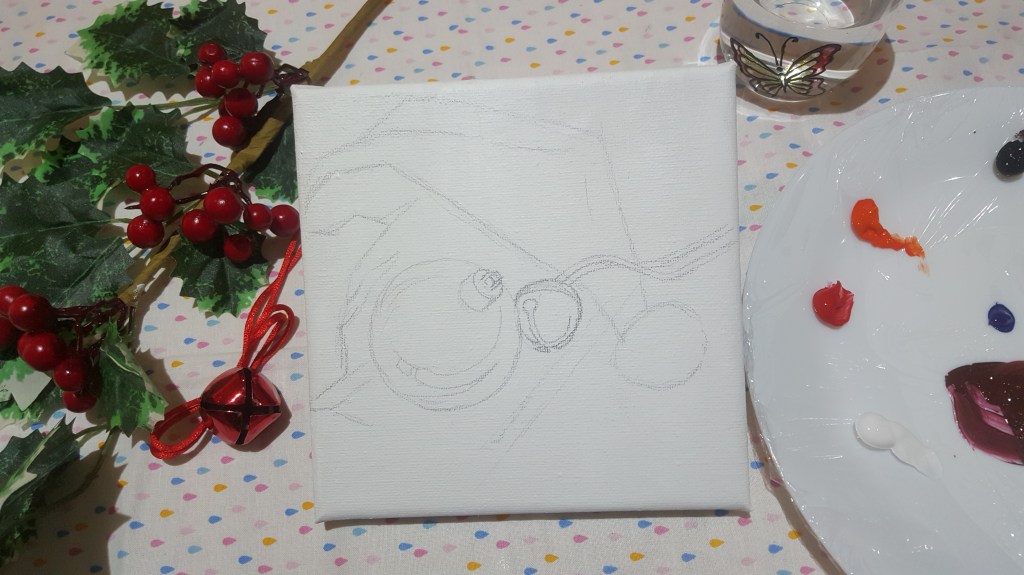
After which now we can start the drawing of our objects in the painting. The objects have easy shape so please refer to the picture above and draw it lightly with help of a pencil.
Moving ahead now as we know the objects are in place and we know their boundaries so lets start with painting with acrylic colors .
Firstly lets color the bottom ground , I have used sap green color here and lightly added the persian blue color to give it a darker tone . In order to make it look uniform and in darker tone I have given 2-3 layers of the same which helps the area stand out.
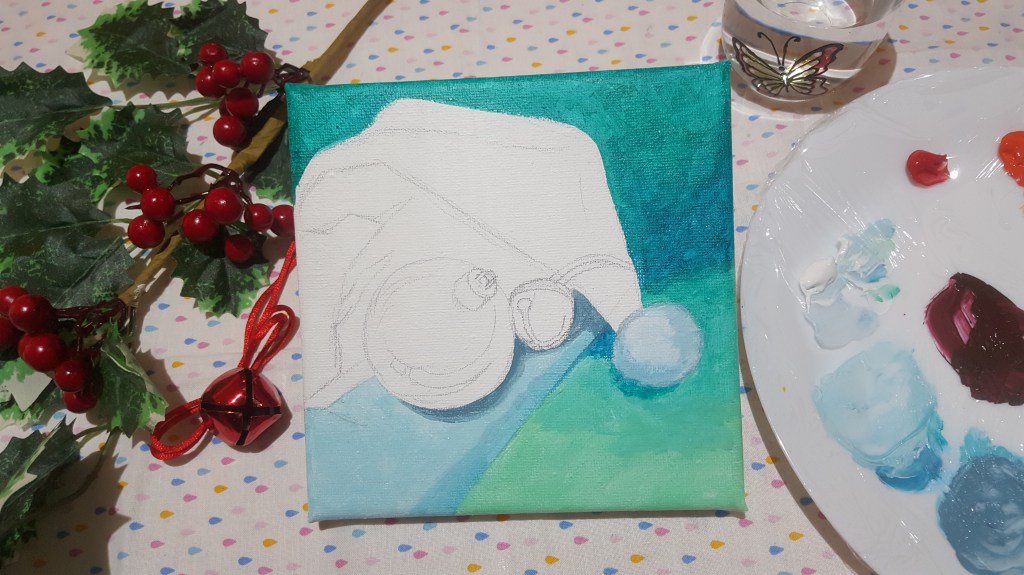
*Moving ahead to festive Christmas Cap , we start with doing the fur border and the soft ball at its end for which ,I have used white color along with a hint of Persian blue color to it.The main point to keep in mind here is that you must understand the fur nature of the border and try and elevate it to give the texture feel . I know initially it may be a little difficult but as we say practice makes it perfect and trying it is the first step towards it.
*After which we start with the top part of the cap using the red color .Here ,there are two parts where the tone of color is dark due to shadow and other part is bright. For the shadow part, I have used Red color with a hint of Persian blue and black color.For the bright part I have used a hint of orange mixed with the red color. As you paint remember the folds of the cap ,as it will give us the impact of the object and how they are arranged. Wherever the cap has folds try and merge the colors to show the transition.
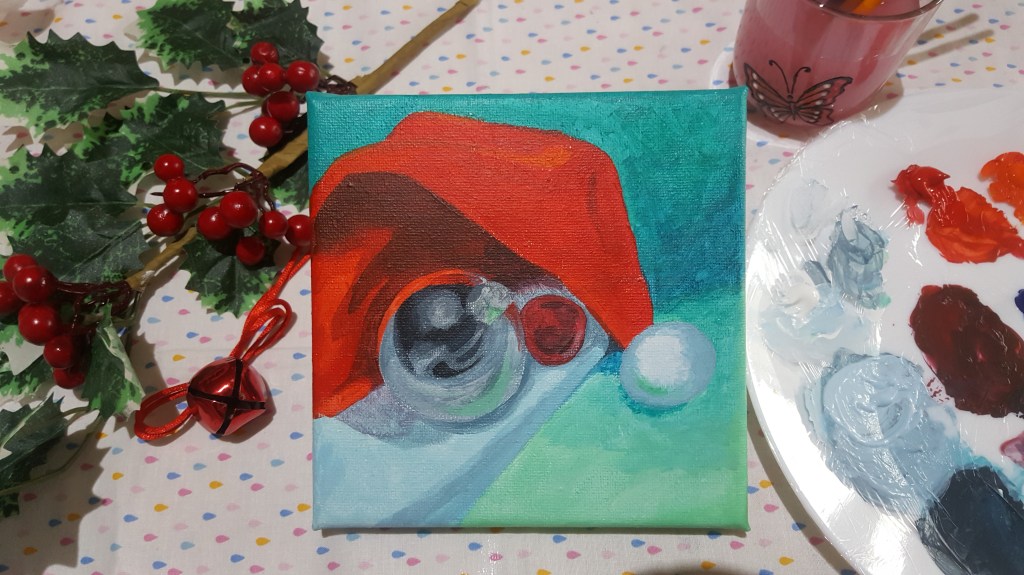

*Our next object is the metallic ball ,this object has many layers to take care of , like the reflection,shades/tones and its position the way it is placed on the cap and its round shape.Here to show reflections a grey color shade is used along with hint of black and white .The merging of different shades is playing a very important role in showcasing the light reflections in the painting.

*Our last object in the painting is the small bell. Here ,the color given to the bell is red color along with change of tones where reflection and depth is observed .Like, the reflection has been shown by using a hint of white and the depth inside the bell as well as the shadow portion is shown by the black color .The merging of colors and the highlights play an important role in the painting so that is a technique you can learn here using these small objects.

Hope you all enjoyed the Christmas Acrylic Painting ,and will try your hand at it without thinking how will it end up looking because anything when done with passion and dedication always shines and looks beautiful.
Hello everyone ,
Today we will be doing a realistic Nose in Watercolors . So, stay calm and follow the steps given below.
ART SUPPLIES USED ARE AS FOLLOWS :
* Windsor and Newton Watercolors.
* Watercolor Brushes.
* WaterColor Paper 220GSM.
* Camel Photo Ink Colors.
As we have already uploaded a nose shading tutorial , I am very sure you will be able to draw the basic structure of nose and also the details where there is highlights required for easy understanding .So, let’s begin this tutorial by choosing colors for the painting.

Firstly , start drawing the basic structure of nose in right proportion with marking the areas of highlights ,light and dark tones as they will help you during further steps .
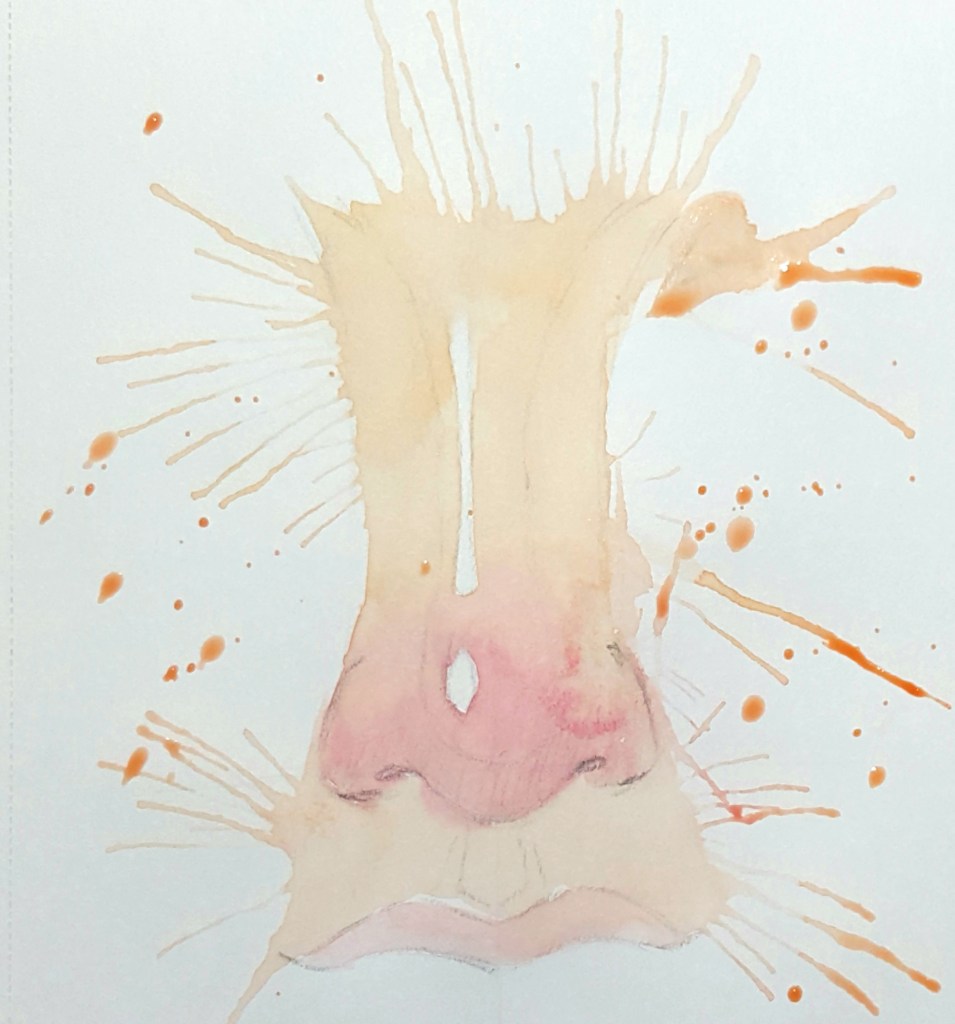
Moving ahead now let’s begin with Watercolors , for which first mix a little bit of yellow ,orange and brown to get the right shade . And start giving your first light shade to the nose , remember to leave the area of highlights and understand the structure when painting Always start painting from up.and slowly go down .
Once you finish the first wash you can simultaneously start randomly splashing some paint near the painting which is very optional. You may also start painting in pink color the lips .

As you finish your first wash , add some more color to your brush and slowly give your second wash to the structure. In this wash remember to add shadow portion on the sides by using a darker tone and also adding a hint of pink color to the pallete. As you move downward and approach the area around the nostrils remember to keep you strokes in such manner that is helps showcasing the curved edges of it. Start adding the pink color along with the skin tone around the nostrils and also just above the lips. Once an initial layer is given to it we will now proceed to the third wash where minor details will be covered.
In the third wash, add the darker tones on areas of shadow and also try and give the details to the round portion of the nose and nostrils with the darker tone. There are few places where you will also have to give the darkest tone such as the nostrils, below the nose , curve of the round portion of the nose, the areas where the nose merges with the cheeks. These are the small details to remember as they give it a realistic look .
So, I hope you all have enjoyed doing this tutorial

Beautiful it is ,
White and pure.
Blooms with faith ,
And withers away in grace .
Spreading the fragrance of friendship and love,
Teaching us a lesson ,
That life is to rejoice and learn .
Hello everyone ,as we move ahead in the shading tutorials .Today we will be doing a eyebrow shading . So, stay calm and follow the steps given below.
ART SUPPLIES USED ARE AS FOLLOWS :
* Sketching Pencil set
*Paper
*Erase
As we move on to our next shading tutorial of eyebrows , just remember we all believe in ourselves and we believe in trying till we get the technique right so pursue your dreams step by step .

Firstly we will be drawing the shape of the eyebrow we want with a pencil .Always start with drawing your shape and then deciding the details of parts requiring the perfect tones.Like for example in an eyebrow we will be using a lighter tone at the start and darker tone as the eyebrow tapers off at the end. You can try using the ear bud technique for merging the shading part as shown in the video .

The next step is lightly shade the eyebrow giving it required thickness and tones. Here, we will be using light tone at the thicker end and medium dark at the center and as the eyebrows taper we will be using the dark tone. We have already studied the different tones in the first shading tutorials .Please refer to it for guidance.

After the shading we will be starting focusing on the detailing part. So, in case of the eyebrows we have to use a sharp pencil and start giving thin but sharp strokes in one direction so that we get the thin hair like strokes.
Always start from one direction and as you start filling you eyebrow remember as we move at the end that is the tapering end of the eyebrow you have to draw two sets of hair one from middle part and other in the downward direction. As you see the video these things will get clarified .
Just remember to observe the structure of the eyebrows and the dense and sparseness of the hair at places.
At the end now you give a light shading base to the eyebrows as base to camouflage the skin below .
So here is the shading tutorial for an eyebrow .Hope you all enjoyed.

Sometimes you feel low,
Sometimes you feel lonely,
Remind yourself each time , everything is temporary.
Let go the negativity ,
And see the positivity,
As that is what gives our gift of life longetivity .
LIPS IN WATERCOLOR
Hi friends, hope u all are healthy and safe . After a few tutorials on basics of sketching today we will be doing lips in watercolors. It ma seem a little difficult to.some but trust me as you try and put in the layers you will see your painting blooming as in the video.
ART SUPPLIES USED ARE AS FOLLOWS :
* Windsor and Newton Watercolors.
* Watercolor Brushes.
* WaterColor Paper 220GSM.
* Camel Photo Ink Colors.
So lets begin to first draw the lips using a pencil .

Here, remember to draw the rough sktech in right proportion. The size of lips should be proportionate as otherwise they will look very different. Try and draw the little details also in there as this will help you while giving highlights.

In order to start coloring ,make sure you make the right skin color tone you require on lips .
You can make it mixing yellow color with red or pink .
First we will be giving the splash effect which is optional so that we can cover the splashes on the lip if they spill .For which , I have used yellow and skin color . Just tap you brush and let the paint do its work.
Now, take some skin color on the brush and start painting the upper lip with slowly and. Remember to leave the highlighted area as we will be keeping it white to give a filling effect.
As you do the skin color slowly start adding the red color onto the lips. After first layer dries add on another darker tone of red and skin color to both the lips one by one . For the darkest tone on the lips you can add a little of Pursian blue color and getb the tone right.

As you finish both the lips now let’s get onto the teeth . For the teeth mix blue,red and yellow color to get light gray and give a light tone to the teeth . Remember to keep the tone light and using the same gray but in darker tone color the inside of mouth behind the teeth thus highlighting the teeth .
Final pic….
Finally just give the touch ups to the minor details and let it dry thoroughly .
Hope you enjoyed this painting tutorial.
Special You
You make me feel special everyday,
Making my life happy and gay.
Ups and downs in life we together sail,
No matter what we will never derail.
I loved you once and will always do,
As I promise ,I will always be there for you.

Hello everyone hope you all are enjoying our beginner friendly tutorials. Today we will be learning how to make simple bunch of colorful balloons using watercolors.
So grab a few colors of your choice and lets begin.
ART SUPPLIES USED ARE AS FOLLOWS :
* Windsor and Newton Watercolors.
*Round Graduate Daler Rowney Brushes.
*Camel Photo Ink
*Handmade Paper / 220GSM watercolor sketch book
*wax candle .

To begin with let’s draw a bunch of balloons using a pencil as shown.
We will be making them showcasing their transparent nature without any design on it, a very simple one.
After drawing the bunch of balloons using a pencil , now we choose few colors of our choice for painting each balloon to make it look colorful .
As we all know ,the balloons will surely have reflection and light and dark tones depending on the light .
Keeping that in mind we will be using a small trick here .With the help of a wax candle we will make the strokes having white area (highlight) on the balloons as shown in the video. This will not allow the water to stay on that part of the paper giving us the effect we need .
After which take your watercolor brush and your desired color to start painting the balloons , remember to keep it light and slowly add the dark tones wherever required. Therefore , keep color less on your brush and more of water content and add more color as you require.
Always wait patiently so that the color of balloons dry properly to avoid any smudging or mixing of two colors which you don’t want.
As you complete all the balloons now, take a thin brush and give an outline to the painting for it to stand out and look attractive .
And here we are having a perfect bunch of watercolor balloons which help us learn the basics of watercolor painting like the amount of water required and how to give light and dark tones easily but patiently .
Hope you all enjoyed the painting .
Friendship:
The month of Friendship and love is here,
Thankyou I say to all the friends near and dear.
In sorrows we help and happiness we laugh,
Making everyday memorable to last.
Watercolor wash techniques :
Hello everyone, today we are here with few watercolor techniques tutorial for every beginner. In which we will be learning techniques which includes how to control the flow of the different watercolors to give it a natural effect , gradation techniques for background of any silhouette or any painting you wish thus giving it a greater depth and merging effect of the beautiful colors.
ART SUPPLIES USED ARE AS FOLLOWS :
* Windsor and Newton Watercolors.
*Round Graduate Daler Rowney Brushes.
*Camel Photo Ink
*Handmade Paper / 220GSM watercolor sketch book.
1. COLOR FLOW TOP TO BOTTOM
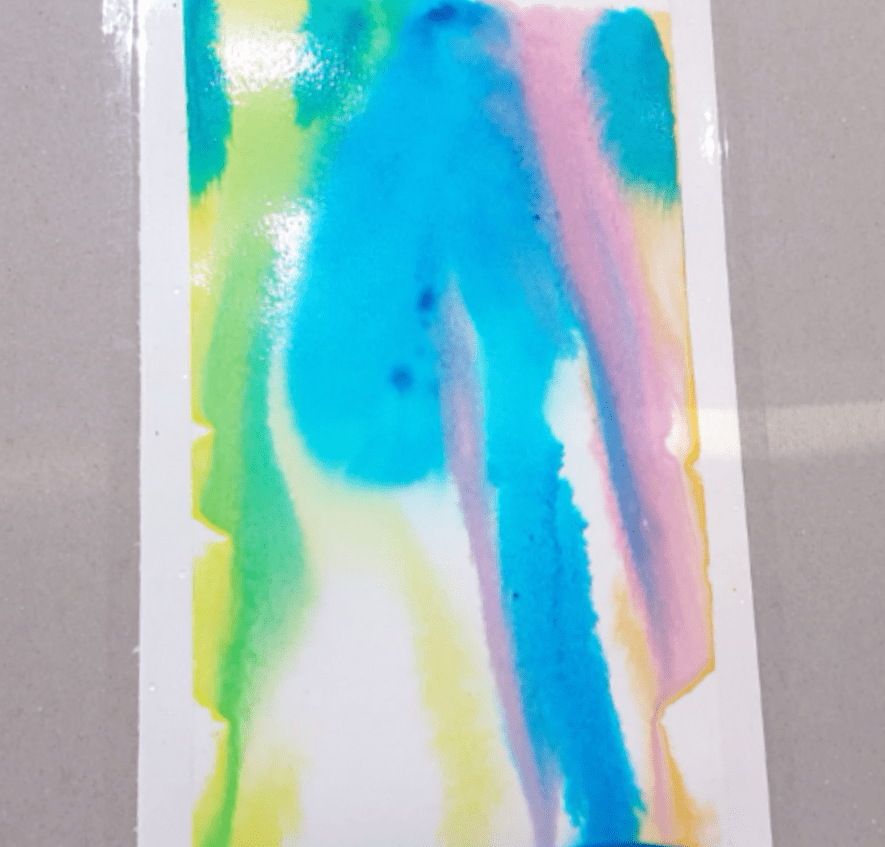
For the first technique which includes managing natural flow of the colors. It’s one of the easy techniques wherein we let the gravity do all the work and just colors merge beautifully in each other.
For this as you hold the paper in slanting position , first give a water wash to the paper where you take enough water in your brush to wet your paper through out .As you do this immediately take good amount of color in your brush and just press your brush in the paper where you want the color to be . Remember to keep your hand light and not too stiff. As you do it you will see the color beautifully moves in the direction of gravity and gives you a flow, slowly now add your selected colors to the places you wish and let the gravity do its job. You can give slight direction to the flow if you want and also see the beautiful merger of two or more colors on the paper as it also give you different shades if allowed to flow naturally (or you may add color as per your wish of dark or light shade ).
So this is the first technique of wash in watercolors : the flow management of flow of different colors on the paper normally used to give natural merging effect in watercolor paintings.
2. LIGHT TO DARK GRADIATION

Our second technique is gradation technique which is used for giving background effect to the paintings specially when you are showing sunset or scenery or even in the silhouette paintings. It can be monochrome or with different colors , technique remains the same .
For the above technique , we always go from the light to dark tones . As shown in the first painting you can see that I have used blue color which gives us the sky effect and the second one is for different colors you wish to use as background in your paintings.
For this first take good amount of water in your brush go horizontal on the paper giving the lightest tone first after which slowly add color and continue going horizontally .Let the color merge in its natural way .Just keep mind to increase the amount of color as you go down to give the color gradient as shown in above image. Keep going and at the end you will see you have the darkest shade . Similarly we can also do with different colors only instead here we have to change the color and keep following the same technique and let the color merge wherever you want them too. Hope you are enjoying the basic techniques . Practice will make your paintings look very natural as your get the way the water and color works on the watercolor paper .
3. CIRCULAR GRADIATION
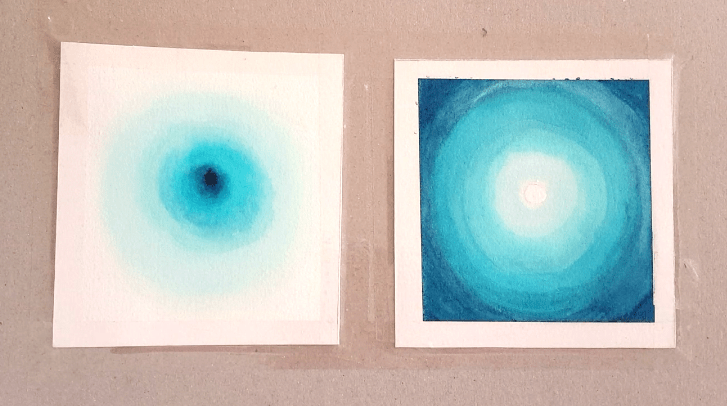
This technique is called the circular gradation technique which helps us give depth to the painting. This technique requires good practice as to how much water :color ratio is required .But don’t worry , above two techniques will help you sail through easily.
For the circular gradation technique , we again start with light to dark tones but in circular fashion. First we start front the place where we want the lightest tone so the center most part, where we just use water and make a circular stroke and gradually then we start adding color in circular strokes one by one to give it gradation of light to dark tones .
It’s very similar to above technique just requires circular strokes to give it depth effect.
So, friends here we are with the watercolor wash techniques for beginners where we have demonstrated how to control flow and and color merging, giving us natural effects.
Hope you all enjoyed .
Republic day
As we celebrate our Republic Day,
Let’s remember the sacrifices many made,
Saluting our heroes who keep us safe.
Forgetting themselves they gave us all,
May it be a natural calamity or a war ,
Never they fail to protect us all.
No words can express the respect we feel ,
Just good wishes we pray for u all.

