
DIWALI DIYA
Celebrating the grand festival Lights- Diwali !! With a simple watercolor art tutorial showcasing a Diwali Diya and its rays of hope,prosperity and happiness…
So Friends ,lets grab some paints and celebrate this Festival of Lights -Diwali with a step by step tutorial of painting a Sparkling Diwali Diya using watercolors. Please don’t worry if you are new to watercolors , just enjoy the process of stress free painting .
ART SUPPLIES USED ARE AS FOLLOWS:
* Windsor and Newton Watercolors.
*Camel Photo Ink (optional).
*Round Graduate Daler Rowney Brushes.
*Handmade Paper / 135GSM Watercolor Sketch book.
**Drawing Diya step by step **
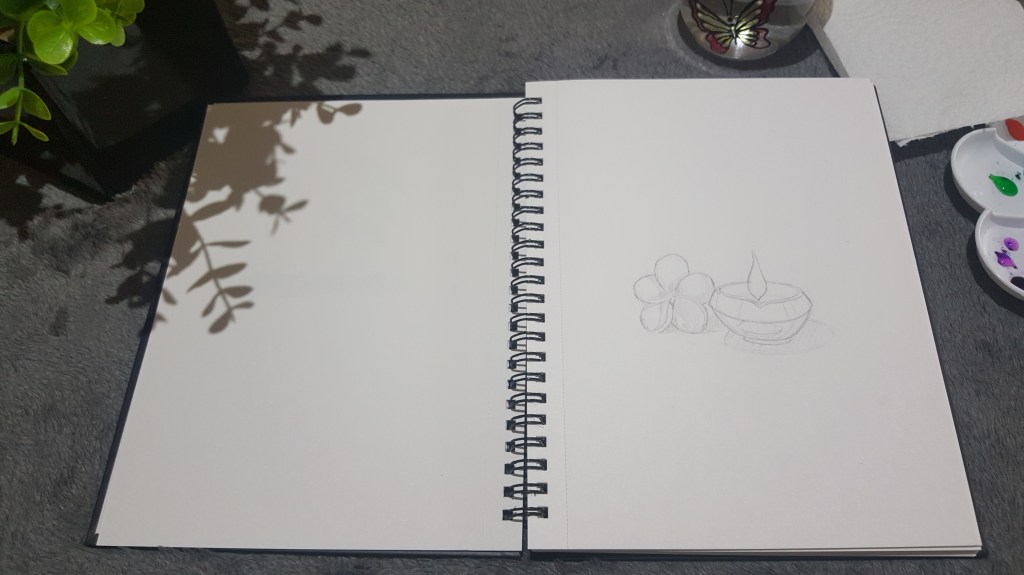
#TIP 1: Always remember to draw your main object a little below the center.
So as you can see in the picture 1 , I have drawn a Diya made up of two oval shapes. After which I have drawn the flame of the diya right above it, remember to make the flame proportionate to the diya.
Then now let’s go on to our next object in the picture that is a flower, this flower is kept at a ground level behind the diya so remember the perspective of objects as it will determine your final look of the painting and also the dark tones you will need to give for making it look realistic .
Now, slowly you can draw the petals of the flower with your pencil and keep the strokes light so that they are not visible later.
#TIP 2: In the above painting there are two light sources,the natural light and that of the diya, which you can always mark for giving the dark tones later.
** Water-coloring step by step**
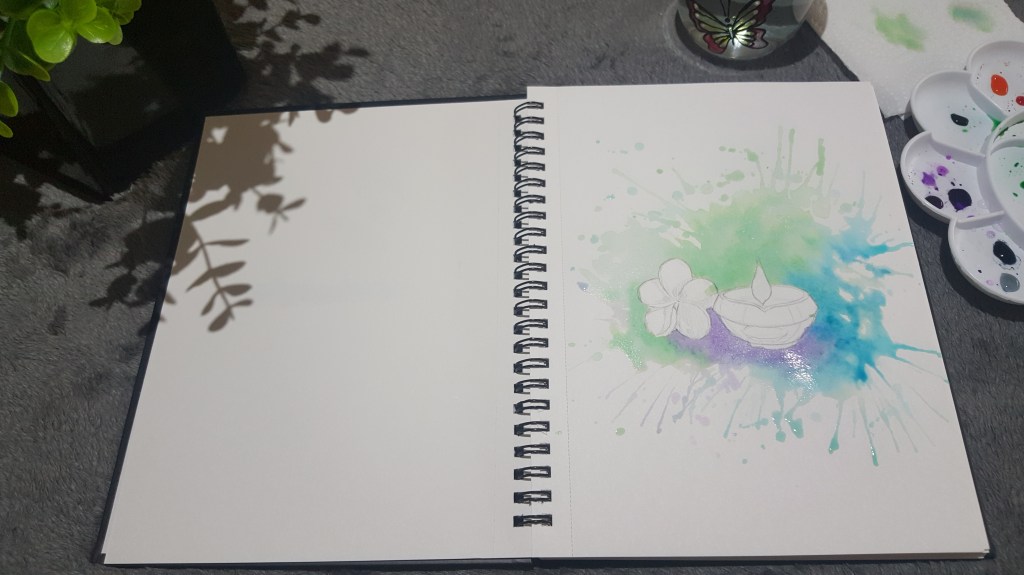
#TIP1: Always start adding colours to background first and then slowly go in to paint your objects.
Since we want to make our painting vibrant I have used a small amount of transparent photo ink along with watercolors ,sap green, Cobalt Blue and Purple colours were used for the background.
We will be dividing our painting in three washes :
This is the colour water ratio approximation I follow, you may change according to your technique,
| STAGES | WASHES | CONTENT IN PERCENTAGE(APPROX) |
| 1. | A | 60% WATER — 40% COLOR |
| 2. | B | 80% WATER — 20% COLOR |
| 3. | C | 40%WATER — 60% COLOR |
WASH A: Firstly we will be doing the background, for which first wet the surface of the paper with little amount of water with your brush and before it dries start adding the background colours slowly in forms of gentle splashes .you will observe that as you touch you brush tip with color on the wet surface the paper soaks it and you get beautiful spread of colors. Don’t exert just touch your brush tip and let the colours flow. Let this wash dry completely before you begin the colouring of the objects .You can always keep a hair drier handy for quick drying of washes.
#TIP: Let the colors have its own natural flow and keep it light toned as slowly we will be building the effects by following washes .
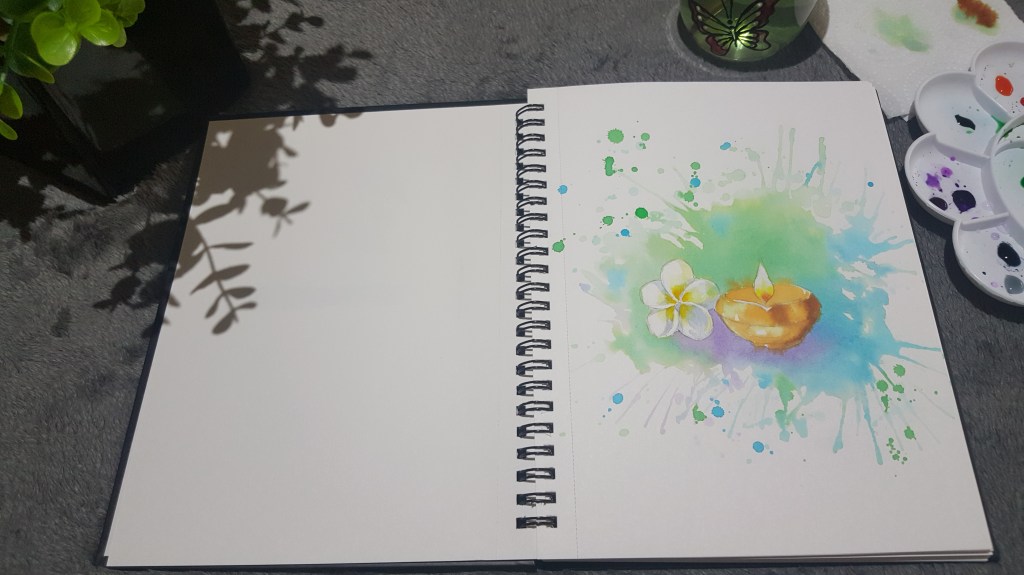
Now let’s begin the first wash on the objects Diya and the flower. For which I have used Yellow ochre color, lightly color the diya with the yellow ochre color leaving the places of highlights to give it a realistic look through showcasing reflection.You can always mark the places of highlights with pencil when sketching as I have done.This was the first coat of Diya now going ahead to color the flower , I have kept the flower white but to enhance it a little bit and show its dark tones I have mixed little bit of cobalt blue+red +yellow to achieve a darker shade to add depth to the flower near the curves. The center of the flower as well as the petals are highlighted using yellow occur color to show the light reflection obtained due to the light of diya.
#TIP: At this stage your painting might look dull or less vibrant but don’t worry, it will get better in following washes subsequently.
WASH B :

Once we have finished giving the basic washes now I have concentrated on darker tones to showcase the highlighted are obtained due to the reflection of light from natural source as well as the diya .
For the background I have now given darker tones near the fame as it give it depth and with some splashes of sap green ,cobalt blue and purple. Special attention Is paid near the flame area so as to show shadow. Moving ahead I have brighten the diya by using orange color (I have used camel photo ink color here as I feel it gives apt brightness and vibrance but its optional)and also added brown color for showing the shadow on the diya surface as well as the texture if the diya.
#TIP: Highlighting the areas with shadow gives the painting a more realistic look so please keep in mind this technique of understanding the light source and shadows.
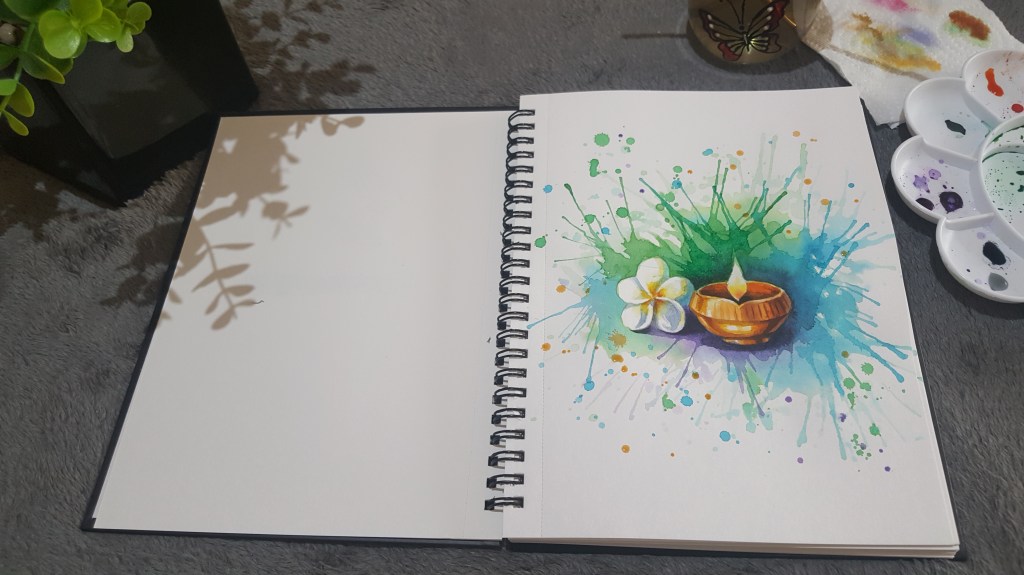
WASH C: Our last wash has more use of color to finally give the touch up required to enhance the painting,for which I have used light yellow to touch up the fame portion lightly and also darken the inside of the diya with a combination of cobalt blue+orange+brown marking the oil in the diya.
At the end I am just touching up the dark tones in places of shadow and here it is our beautiful watercolur painting of Diwali Diya
Hope you all enjoyed it ….if you have passion at heart then nothing can stop you ..
