TUTORIAL 10: HOW TO DRAW A NOSE BY SKETCHING


Hello everyone ,as we move ahead in the shading tutorials .Today we will be doing a realistic Nose shading . So, stay calm and follow the steps given below

ART SUPPLIES USED ARE AS FOLLOWS :

* Sketching Pencil set

*Paper

*Erase

**DRAWING NOSE STEP BY STEP **

Let’s begin with the sketching , initially you can use any HB Pencil you like .After getting the tones right and you understand the technique you can always start using different sketching pencils. Pencil sketching primarily involves tones light, medium and dark depending on the object you are creating with respect to all the light source and reflections. So, once you know how much pressure to put for each tone you will surely master it soon.

As I said earlier we will begin first by adding the lighter tones ,thus using HB pencil to start with to just understand the basic structure of the nose. Begin to shade in one direction slowly marking the thickness and shape of the nose . this will comprise of first layer which will be light toned.
As you proceed now , start using your 4B pencil to give medium tone , remember to give strokes on one Direction only and avoid using eraser as much as possible when you shade.
Understand the shape of the nose as it leads to the nostrils where the curves of it will have to be given in the similar shape .

As you can see in the above figure the upper part of the nose is kept light toned as it shows the slopes on either sides and also a little reflection is seen too as light falls on it .So, remember to keep it light shade and show the reflection with a small part at the centre which is left blank.
Just above the nostrils you have to show the pointed part of the nose .But, since it is a frontal view you have to show it with slight curve .Since the curve part in reality is the part that curves inside ,the part below it given a medium tone .Whereas, the area near the nostrils is given a darker tone showcasing shadow .
As we move towards the caved part of nostrils ensure that you do keep in mind about the dark tone inside the caved in part .These small details lead to the realistic view otherwise it may look incomplete or one dimensional leading to looking different as discussed.
When you shade always consider the surrounding of that figure as in here it is the part below nostrils which we have catered to by giving it slight shadow in medium tone .Thus, giving the slight hint of its position on face .

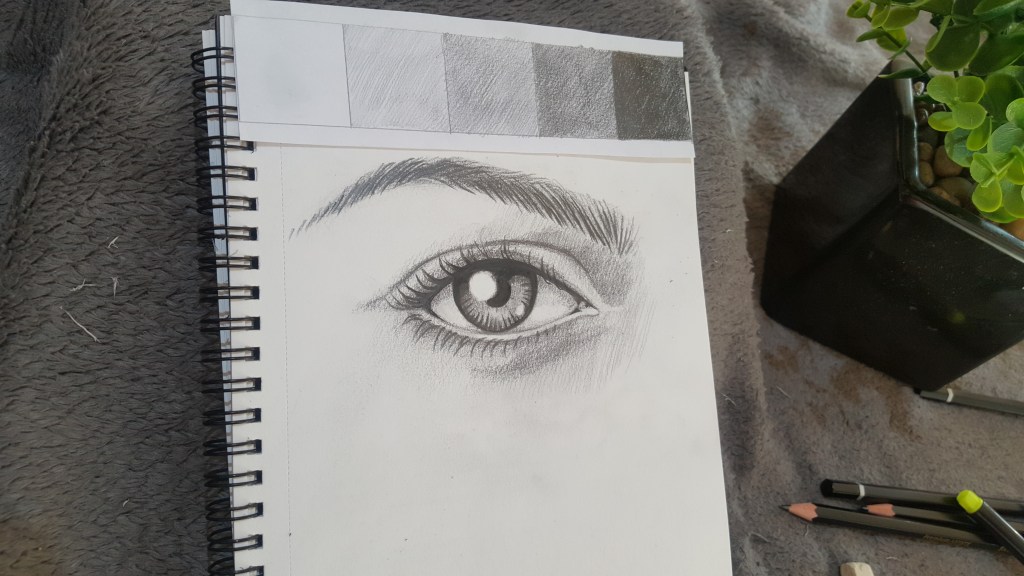
Every detail in the shading adds to its realistic appearance ,so never skip any part .As shown above the shade card is given to understand the light, medium, dark shades. So, when you do it you will get an idea as to how much light and dark tones we require .

This technique of hatching in sketching is not only great to try out when you are a beginner but also gives you as easy start to pursue and practice the skill.

Gain confidence while you practice, as without practice there in no perfection .

Hope you have enjoyed it!

WEEKLY DRAW DIARY 10:

vaccinE

As we fight the pandemic together,
With vigil and caution.
Doctors are our hero warriors,
Helping infected to be strong survivors.
Scientists have shown a ray of hope,
Vaccine is here to help us all cope.
Happy times are near,
Just few more days of self control to steer .
Don’t put your guard down yet,
Till we have the pandemic all clear, to meet our loved ones near and dear .

TUTORIAL 9: HOW TO DRAW AN EYE USING WATERCOLORS

HOW TO DRAW AN EYE USING WATERCOLORS

In today’s tutorial ,we will be learning to draw an eye using watercolors.We have already learnt the how to draw and shade a realistic eye ,so tiny details of its structure and importance of the shadows as well as places of darker and lighter tones are pretty much explained .So, friends lets grab some watercolors and begin with the tutorial .

ART SUPPLIES USED ARE AS FOLLOWS :

*Watercolor Paper 220 GSM

* Windsor and Newton Watercolors.

* Watercolor Brushes

*Erase

*Ink colors

*STEP BY STEP TUTORIAL**

We all have learnt how to draw and shade a realistic eye in previous tutorial .Today we will be ding the same but instead of sketching we will be painting using watercolors.So, firstly draw an eye as shown in the above figure using a light pencil .Always mark the areas in which you need to put in darker tones and places where you need to leave the white of the paper ,for your ease of understanding.Once you have done that we can start using the watercolors .

In this painting we are going to use watercolors and ink colors for added brightness .In order to get the splash effect lets first take some violet and orange color and add it in up to down fashion. Use less of color and more of water when you are using the colors. Let the colors flow in downwards direction and you may direct the flow according to your wish by blowing the color drop when it is trickling downwards using a plastic straw.Faintly color the the area near the eye also with the help of a brush as shown above.Once your color near the eyebrows has dried you can start giving the strokes for eyebrow hair with brown color.Similarly ,now we also start coloring the eye ball with blue color leaving the highlights .Remember the areas of darker tones and that of the lighter tones.

Now moving on to the second wash which will make your painting a little more brighter than your first wash.Once your first wash has completely dried then take some more of orange color and start adding the splashes again and directing the flow as before .Similarly ,you may also start adding the violet color and use the same technique to get the splash effect.The places to now concentrate are the areas near the eye where you need to be careful to add darker tones along with the highlighting the areas like the eye waterline area and the borders of the eye where the skin folds .

Further completing the painting by finishing the third wash where you add more of the color than water to the places where you wish to make brighter.Also using a thin brush add thin uniform strokes representing the eyebrow hair and adding small details of darker tone to the eyeball too.

Above is closeup view of how the colors should be added inside the eye to give us a 3D effect.The main trick here in this painting is to learn how to mix colors and understand the details we require for more realistic view.So, friend , I hope you enjoyed the tutorial ,looking forward hearing from you all as to how the painting turned out through mail .

TUTORIAL 8: HOW TO DO EYE SHADING

HOW TO DO REALISTIC EYE SHADING

In today’s sketching tutorial we will be learning how to draw and shade an eye in the most realistic way possible.

The essence of shading ,rendering and light effect are going to be demonstrated here.Hope ,you all like it .

ART SUPPLIES USED ARE AS FOLLOWS :

* Sketching Pencil set

*Paper

*Erase

**DRAWING Snowman STEP BY STEP **

Let’s begin with the sketching , initially you can use any HB Pencil you like .After getting the tones right and you understand the technique you can always start using different sketching pencils. Pencil sketching primarily involves tones light,medium and dark depending on the object you are creating with respect to all the light source and reflections. So, once you know how much pressure to put for each tone you will surely master it soon.

Though it looks a little difficult , just follow step by step and you will surely get it right .We will first draw an eye ,for which we will use certain reference lines to make it proportionate and of right size as shown in the figure above .Do erase all the extra lines which will nit be required later .Remember to keep the reference lines faint so that they do not stand out too much later.

Now let’s start rendering the eye ball first .The method we are using here is again the hatching technique.The ball we start giving a medium tone .Remember to use the pencil in slant position and slowly complete it. For the center darkest tone is used so that we can uplift the highlights properly .So, remember to understand these places of highlights and darker tones.As, you are a beginner ,please refer to the figure above for ease of understanding.

As, you proceed also learn to add texture and light tones at the borders in between with your pencils these are just small strokes to give the eye a realistic look .

Moving ahead to the eyebrow,draw the rough lines for understanding the required shape of the eyebrow.For the eyebrows try and use pointed pencil as you will then get proper strokes for the hair you want to show.Always maintain the thickness and shape as you make the strokes as show in the figure.

When you start rendering the skin portion around the eye, use lighter tone.Whereas, the places such as the ends of the eye, the skin fold above the eye and the eye lash border keep it dark and thin .Make sure you use pointed pencil and give them a proper thickness required as shown in the figure above.Make sure the strokes of eyelashes are pointed and for correct length .Stay patient and make them as they give the sketch a character .

Every detail in the shading adds to ts realistic appearance ,so never skip any part .As shown above the shade card is given to understand the light,medium,dark shades. So, when you do it you will get an idea as to how much light and dark tones we require .

This technique of hatching in sketching is not only great to try out when you are a beginner but also gives you as easy start to pursue and practice the skill.

Hope you have enjoyed it!

TUTORIAL 7: JINGLE BELL :PENCIL SKETCHING

Jingle Bell

Today , we are going to learn something new .A technique in which all you need is a pencil and a paper ,this technique is known as pencil sketching. We all have done it some time or the other in our lives .Sometimes just scribbling behind our school notebooks or just shading a flower you drew waiting for someone.Since chirstmas is just round the corner ,we have selected a Christmas bell as our object for today’s pencil sketch.

ART SUPPLIES USED ARE AS FOLLOWS :

* Sketching Pencil set

*Paper

*Erase

**DRAWING Snowman STEP BY STEP **

Let’s begin with the sketching , initially you can use any HB Pencil you like .After getting the tones right and you understand the technique you can always start using different sketching pencils. Pencil sketching primarily involves tones light,medium and dark depending on the object you are creating with respect to all the light source and reflections. So, once you know how much pressure to put for each tone you will surely master it soon.

Firstly, draw the bell outline as shown the fig above, you need to get the shape right first and then we may proceed ahead.Always remember to start with light tone first and slowly move on to dark tones wherever required as later its difficult to get light tone and using eraser is something you want to avoid as much as possible.Getting the shape and object position is very important here as it later determines your strokes which will give the round effect in this case .Start using your pencil for rendering in one direction and remember to use it in one direction only ,keeping the tone light .I have left the portion of reflection blank as it will show the reflections (so i have excluded those spaces in the drawing by marking t hem lightly).

The type of technique we are going to use is the hatching technique. Its using your pencil in one direction and with same pressure through out the sketch and is widely used .

As you can see in above figure, we have now rendered using a medium tone (ie. a little darker than before ).The areas of shadows or where light is not reaching are the ones to be given a darker tone than the rest of the areas on the bell. Now, you will observe that your sketch is coming to life ,as it is getting a 3D view since we are catering for reflections and areas where light is not reaching giving it lighter and darker tones respectively.

This is our last step towards our sketch where we will look into minute details such as the reflection of bell on the ground , giving darker tone to the light cannot reach like the center of the bell ie. the hollow space.Since the bell is made of metal even the reflection details on the chain needs to be done properly .In this step ,you can use 6B or 8B as they have darker tone and it is easier to give the required darker tone where needed.

Always remember that Sketching though seems easy needs patience and understanding just as other forms of paintings .Understanding of perspectives and light sources come with practice and as we all say practice makes a man perfect .So, lets begin this journey of sketching with lots of dedication with his beautiful and easy sketching technique.Hope you all enjoy !

TUTORIAL 6: NEW YEAR CARD

New Year Card

As this 2020 year is coming to end making us realise you cannot take the Nature for granted and bowing down to it is the only right thing to do. This year has been full of ups and downs for each one of us; many lived for others and also laid down their lives for the humankind. Let us also remember all the Covid Warriors (doctors, nurses and medical staff, sanitary workers) and our soldiers who sacrificed their lives for their nation. Let us all pray for them and their families, hoping for a  healthy New Year full of happiness, peace and tranquillity.

ART SUPPLIES USED ARE AS FOLLOWS :

* Camel Photo Ink Colors.

* Windsor and Newton Watercolors.

* Watercolor Brushes.

* WaterColor Paper 220GSM.

* Black sketch pen

* White acrylic color

**DRAWING NEW YEAR CARD STEP BY STEP **

Firstly, let’s write the no.2021 on your paper as shown above. You can also use a stencil or jus a scale choosing your width, size, length as desired .Following which now you can add the little butterfly at one end just touching the number .You can be as creative as you like to draw the butterfly.

Now this step is really important to make your year pop out nice and bright. Now, take a white candle and start rendering it inside the year 2021 number you have written. Make sure you cover all the corners and spaces to avoid any color to enter it.

Now, it’s the most exciting part and that involves mixing of colors through blowing them .Wondering now? Let me explain, with the help of a brush start wetting the area around 2021 slowly and slowly drop colors. Let the colors take its course and start blowing the drops when wet in different directions you want to get that wonderful spread of the colors. It’s   okay if they mix along the way just make sure you are not too strict with yourself, use the colors of your choice and just let the colors do their job.

Once dries now you can move on to the little butterfly and color it as you wish .After which you can slowly give an outline to 2021 with a sketch pen and then jus drop few drops of white acrylic paint in form of dots here and there.

This painting is all about your choices and having a good time with them. Just play with colors and adjust their brightness and quantity used to make the tones you wish to see. So, make your own choices and develop a painting in your own style .Hope you will enjoy it and do let us know how you felt after trying it.